User Guide

Survey overview

Web Finesse is an online data collection facility that helps researchers in the gathering of participant responses through survey or interview type investigations.

Web Finesse caters for either single researchers, or teams of researchers working on the same project, to design, build and maintain survey schedules, and to administer these surveys to their intended research subjects.

Through Web Finesse’s email blast utility, surveys can be emailed out to entire batches of respondents for the respondents to complete the survey online.

Web Finesse also provides the means for project administrators to capture previously collected data gathered from other sources.

All data captured for the respondents can be exported and downloaded in both XML or CSV file formats for researchers to use in their own data analysis.

Surveys can be broken up into 3 main components:

  1. Sections: Some surveys are large enough that the questions they ask can be clearly grouped into their own logical categories. For example, a survey studying the effects of poverty on mental health might group questions regarding nutrition in childhood as being distinct from questions about employment status in adulthood. These separate categories under one survey are here referred to as sections.
    Every survey requires at least 1 section to place their items (questions) under. For larger surveys, grouping your items into logical sections will help in maintaining the survey, as well as give the participant feedback that progress is being made whilst completing their survey.
    Note too that both the survey title and the section title appear on the web page when participant fills out the survey form.
  2. Items: Survey items are the particular questions to be asked in the survey. Items follow a scheduled sequence in the survey using a Go-To attribute assigned to it. For example, after responding to Item-1, the next question asked will be Item-2, and then Item-3, etc. The Go-To attribute is used in determining which item to ask according to the survey’s schedule.
  3. Rules: Item rules are used in determining the next item to ask in the survey’s schedule when there is more than 1 possible route to follow. For example, let’s say that, in a survey investigating preventative healthcare, that Item-1 asks for the participant’s sex. If the participant’s response to Item-1 is Male, then a rule for Item-1 can direct the sequence to Item-2, which pertains to prostate exams. Whereas, if the participant responded with Female, then a rule for Item-1 can direct the sequence to Item-3, which is about mammograms.

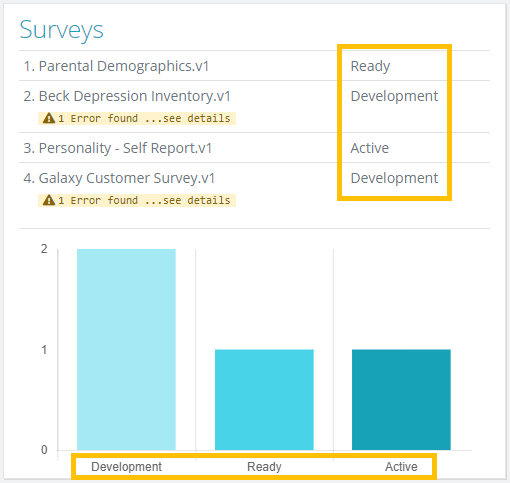
The survey status defines the state at which the survey is in within its development life-cycle. There are 3 survey states:

  1. Development: The Development state is given to the survey when the survey is first created. During this state, the sections and the items of the survey can be maintained. Once all the items have been added to the survey and the survey is ready to be administered, the survey can then be published. Publishing a survey will take it out of the Development state and into the Ready state.
  2. Ready: The Ready state is given to the survey once it has successfully been published. This state declares that the survey is ready to be administered but has not been administered to any of the participants yet. The sections and items of a survey in the Ready state are no longer maintainable. If you wish to make further changes to the survey once it is in the Ready state, you will need to then Un-publish the survey. This will then revert the survey back into the Development state.
  3. Active: The Active state is given to the survey on commencement of the very first administration of the survey. Once the survey is in the Active state the survey can no longer be modified. This is done to maintain the integrity of the survey; to ensure that a specific survey given to one participant matches all other administrations of that survey to any other participant. If you do end up needing to make further changes to the survey at this point, then you can copy the survey, which will make a copy of the same survey, but the new copy will be in the Development state, ready for your further changes. Please see the What do the Copy and New Wave functions do? for instruction on how to do this.
Web Finesse - Survey status

New Wave function:

  • The New Wave function creates a new version of a survey that has already completed development and is now in an Active state.
  • Creating a new version of a survey creates a copy of all the sections and items of the copied survey. It retains the same survey ID, but gives the new copy its own unique version number, usually for the intent of running the same survey under a new cohort or wave of participants.
  • The new version will be published and made ready for interviewing. It is the intention of the New Wave function to maintain the study’s integrity by ensuring that the same survey schedule is being administered. The new version's sections and items, therefore, cannot be modified. If you need to make further changes to the survey, we recommend making a copy of the survey instead.

Copy function:

  • Creating a copy of a survey creates a copy of all the sections and items of the copied survey, but gives the new copy its own unique survey ID, as well as placing it under development status, to be maintained and used as its own entity.
  • The intention of the copy function is one of convenience, by helping researchers create a new survey, that might be largely based on the copied survey, without having to start from scratch.

Adding users — participants and administrators

To add a new user

  1. Go to the Users dropdown in the main navigation and you click on Add new user.
  2. From here you’ll be taken to the new user form and asked to enter the new user’s name, surname and email address.
  3. Next, you’ll need to select the user’s privilege, whether you are entering them as an administrator or as a participant. These are 2 very different kinds of users. An administrator is someone who will be given access to your group's account with the authority to create and maintains the surveys, as well as complete surveys on behalf of participants. Participants are the actual participants of the survey, those who you will be giving the survey to.
  4. When participant is selected, you will be given the opportunity to capture the participant’s sex and date of birth. It’s often the case that researches may already have this information before conducting the survey, and in such cases this information can be used when designing the survey and mapping out the rules for certain items. But you are not required to enter this information if you do not have it or don’t want to.
  5. Click on the Add user button and the new user will be created.
  6. When administrator is selected, an email will be sent to the email address entered with the admin’s login information.

Administrators:
An administrator is someone who will be given access to your group's account with the authority to create and maintains the surveys, as well as complete surveys on behalf of participants.

Participants: Participants are the group of subjects who share a defining characteristic with whom you will be gathering the survey data from; the group of individuals who you will be conducting your research on.

No, you do not need to enter the participant's sex or date of birth
When participant is selected as the user's privilege, you will be given the opportunity to capture the participant’s sex and date of birth. It’s often the case that researches may already have this information before conducting the survey, and in such cases this information can be used when designing the survey and mapping out the rules for certain items. But you are not required to enter this information if you do not have it or don’t want to.

Creating a survey

To create a new survey:

  1. Select Create new survey from the Survey dropdown in the main navigation menu bar.
  2. You will then be prompted to enter a title for the new survey.
  3. Once the title has been entered, click on the Add survey button and the survey will be created.
  4. You will then automatically be taken to the Section Manager, which will be the next step in the survey creation process.
    Please see Add new section for further details on how to do this.
  5. If you go to the Survey Manager, you can see your new survey listed along with its own unique id.

In order to add a new section, the survey must be in the Development state.

  1. Select the Surveys dropdown from the main navigation menu, then select Survey manager.
  2. From here, you’ll be taken to the Survey manager that lists all surveys created for your group. From the list, identify the survey you wish to add the new section to, and click on the survey’s Sections button.
  3. You will then be taken to the Section Manager. From here, click on the Add new section button.
  4. Next, enter the Section number (the number you want to uniquely identify the section by). This number will be automatically generated for you, but you can change it if you so choose. Sections should be in the same numerical order as the order in which you wish the section to appear in the survey.
  5. Next, enter the Section name. This will be the title for the section. Keep in mind when naming the section that the Section name, along with the Survey title, will appear on the webpage form that the participant uses to complete the survey.
  6. Once the information has been entered, click on the Create new section button to add the new section.

In order to add an item, the survey must be in the Development state

  1. Select the Surveys dropdown from the main navigation menu, then select Survey manager.
  2. From here, you’ll be taken to the Survey manager that lists all surveys created for your group. From the list, identify the survey you wish to add the new section to, and click on the survey’s Items button.
    If you have not yet added any Sections to your survey, the Items button will be disabled until you do so. Please see How do I add sections for instructions on how to do this.
  3. You will then be taken to the Item Manager for a given Section. The system will automatically place you within the first Section of your survey. If you need to add an item to a different Section, select the Section you want from the Select section dropdown menu.
  4. Select the Add new item button, and the item form will appear requesting the details for the question to be asked.

Please see What different options are there for the item questions? for details on how to fill out the item form.

Input fields:

  1. Item number: The item number uniquely identifies the item, and it is used to map the sequence of the survey.
    The item number is automatically populated by the system and is assigned the next number in the numeric sequence for this section, but it can be changed to another number that hasn't been used yet.
    The item numbers must be in the same numerical order that you would like them to appear in the survey.
  2. Question: Enter here the exact phrasing of the question that you would like asked.
    Sometimes your item may be for a statement only. In such cases, the statement gets captured here too.
  3. Response type: Select from the dropdown list the method with which you would like to receive the response to this question.
    Options available are:
    • Text line (Open input, max 100 characters)
    • Text box (Open input, max 1000 characters)
    • Numeric (Number as an integer)
    • Decimal (Number with 2 decimal places)
    • Multiple-select - Checkbox
    • Single-select - Radio button
    • Single-select - Dropdown
    • Statement only (Often used for instructions or introductions)
    • Date (dd/mm/yyyy)
    • Year (yyyy)
  4. Options: This is to be filled in for Checkbox, Dropdown list and Radio button response types. For this, list the different options you would like to present the participant as possible answers for the question.
    Press the enter key on your keyboard after each option to mark the end of an option and move to a new line.
  5. Response length: This is to be filled in for Text line, Text box, Numeric and Decimal response types. How many characters should the respondent's answer be? Is there a maximum amount?
    For example, entering an age should only requires a maximum of 3 digits.
    Maximum amounts that can be entered by type are:
    • Text line: must be > 0, max 100 chars
    • Text box: must be > 0, max 1000 chars
    • Number: must be > 0, max 11 integers
    • Decimal: must be > 0, max 11 integers (Only 2 decimals will be provided)
  6. Min: This is to be filled in for Numeric and Decimal response types. What is the minimum value the participant can enter?
  7. Max: This is to be filled in for Numeric and Decimal response types. What is the maximum value the participant can enter?
  8. Align options: This option is available for Checkbox and Radio button response types only. Leave this box unchecked if you want the options to be listed vertically
    Check this box if you want the options listed horizontally.
  9. Loop set: Sometimes you may have a set of questions that you need to ask multiple times, but you don't know how many times.
    For example, say you want to capture the name and birthdate of all the participant's children. However, the number of children will vary from participant to participant.
    The loop set allows you to define a set of questions that you would like to ask a variable number of times. To do so, mark the first and last questions in the set. In the interview, the participant will be given the option to add another iteration of the set. All questions (item) that fall between the start and end loop set will then be asked again.
    Tick the Start Loop box if this item is the first question in such a set.
    Tick the End Loop box if this item is the last question in such a set.
    Every Start loop item needs a matching End loop item defined later in the sequence.
  10. Loop title: Questions marked as the start of a loop set will need to be provided with a loop title. The loop title will be used to label each iteration set entered by the participant, as well as when the participant is invited to add another iteration. Give your loop set a meaningful title, and make it singular.

    For example, if you are enquiring about the participant's children, a loop title of "Child" can be used to label this set. Therefore, each iteration will be labeled as Child 1, Child 2, Child 3, etc., and the participant will be invited to add the details of another child with: Would you like to add another child?
  11. GOTO: Map the course of the survey to the next question (item).
    What is the next item in the sequence of the survey?
    Each item has an Item Number and is contained within a Section that is numbered.
    For instance, after the participant has answered Section 1 Item 3 the sequence of the survey may go to Section 1 Item 4 next.

    However, not all mapping sequences for the survey are as straight forward as this. It may be that the next item in the survey's sequence will be determined by the response given to the current question, or even a response from a previous question. Such rules for mapping to differnt items can be set once this item has been added. In such cases, set the Go to Section and Item to one of the items you will be mapping a rule to.
  12. Final item: Only check this box for the very last item of the survey.
    The system needs to know when we're done.

    Note! Often the final item of a survey is not a question, but rather a statement thanking the participant for their participation.

In order to add a rule to an item, the item must first be created and saved.

The explanation below will follow a case example to demonstrate the formula for the rule.
For our case, we will look at adding the following rule:
If the answer to Section 1 – Item 5 is greater than 45, then GOTO Section 1 – Item 9.

Item rules follow the formula:
If X operation Y, then GOTO Section Item

  1. From the Item Manager page, go to the item you would like to add the rule to, and click on the Rule button (the button on the right symbolized by two intersecting arrows) for this item.
  2. The Rules dialogue will then appear, listing all rules that have been captured for this item. Click the Add rule button, and you will be presented with the input fields for the new rule.
  3. First fill in the value for the X variable. The value for X can be selected from the dropdown selection list. The X value list to select from is comprised of all the items that have already been captured for the survey. An X value of Sex, Age and DOB can also be used if the information has been captured when adding the participants.
    From our case example, you would select 1I5 from the list to select Section 1 – Item 5.
  4. Next, select the operation between the X variable and the Y variable. The operation can be selected from a dropdown list and is comprised of the following mathematical operators:
    • = (equal to)
    • != (not equal to)
    • > (greater than)
    • < (less than)
    • >= (greater than or equal to)
    • <= (less than or equal to)
    From our case example, you would select > from the list to select greater than.
  5. After the X value has been selected, the Y variable will appear with an input based on the type of question X is referenced to. If X is a question with specific options, like those used for checkboxes, radio buttons and dropdown lists, then then these same options will be given to you to select from as your Y variable. Otherwise, the Y variable will be an open input text field.
    From our case example, you would enter the number 45 into the Y variable.
  6. Next, you need to enter the GOTO Section and Item.
    From our case example, you would enter the number 1 for Section 1, and the number 5 for Item 5.
  7. Once you have entered in all the values for the rule, the rule should read as:
    if 1I5 > 45, GOTO Section 1 Item 5.
  8. Click on the Save rules button, and the rule will be added.

It is possible to add complex rules for cases where there might be more than one condition to meet before accepting the statement as being true. To do so:

  1. Add the first condition of your rule.
  2. Click on either the AND or the OR logical operator radio buttons.
  3. Once a logical operator has been selected, only conditions matching the same operator can then be added to the same rule. So for example, you might ask:
    If Age is greater than 20, AND Sex is Female, then GOTO Section 1 – Item 7.
    We can add as many conditions to the rule as we like, but all subsequent conditions will need to use the same AND logical operator. So we might have a complex rule as follows:
    If Age is greater than 20, AND Age is less than 60, AND Sex is Female, then GOTO Section 1 – Item 7.

Within the world of logic, logical conditions can become more complex by mixing both the AND and the OR operators. However, this level of complexity is unnecessary for our purposes here, because instead of doing this, you can simply add more than 1 rule. For example, you might want to ask:

If Age is greater than 60, AND Sex is Female, OR Sex is Male, then GOTO Section 1 – Item 7.

In such cases you should make 1 rule for the AND conditions and another rule for the OR condition.

So rule 1 will be:
If Age is greater than 60, AND Sex is Female then GOTO Section 1 – Item 7

And rule 2 will be:
If Sex is Male, then GOTO Section 1 – Item 7.
Running a survey
  1. Select the Surveys dropdown from the main navigation menu, then select Email survey to…
  2. You will then be taken to the Email Survey to Participants page. Next, select the survey you wish to post from the dropdown list. Only surveys that are either in the Ready or the Active state will be listed here.
  3. Once the survey has been selected, a list of all your participants will be presented. You can either select all the participants at once (if you want the survey to go out to the whole group), or you can select individual participants if you would like to send the survey to particular subjects. Note, participants who have already completed the selected survey will not be available for selection again.
    Check the selection boxes of those individuals you wish to post the survey to, and then click on the Write email message button.
  4. Once the participants have been selected, you will then be asked to compose the email. The mail composition form comprises of the following fields:
    • Email subject
    • Salutation
    • Body
    • Complimentary close
    • Signature line

    All these fields will be pre-populated for you with a suggested message. This message only serves as a guide for you, but you are encouraged to write your own message that is fitting for your survey and your participants.
    Once you have completed the email composition form, click on the Review email button.

  5. You will then be presented with the contents of the email in the final form that will be sent to the participant. Note too that, here you can scroll through all the participants that the email will be sent to, to ensure that you have selected the correct subjects. Take a moment to ensure that the email’s composition is correct and that you do not have any spelling errors or mistakes in grammar. Once the email goes out, it cannot be changed.
    If you require further changes, click the Change email button to return to the email composition form.
    If you are happy with the email composition, then click the Send Survey button to confirm and email the survey.
  6. After you have emailed the survey, you will then be redirected to the Email Blast History page. This page lists the history of all surveys sent out by your group, with the latest posting listed at the top. You will be provided with the success/error status of your email positing to verify whether the email was sent correctly.

There may be situations where you might need to complete the survey on behalf of the participant, or simply capture the participant’s responses into the system. For example, survey data might be gathered telephonically or in the field. Because of such cases, all administrators for your group have the authority to capture individual participant’s responses. Note, the system keeps a log of which user actually captures the data for the survey, per survey section, be they a participant or an administrator.

  1. Select the Users dropdown from the main navigation menu, then select Participants.
  2. You will then be directed to the Maintain Participants page. From the listed participants, find the participant for who you would like to capture their responses for and then click on the Run survey dropdown.
  3. The Run survey dropdown lists all surveys for your group. Only those surveys that are in the Ready or the Active state are made available for running. If the chosen participant has already completed the survey, then the survey will no longer be available for running for this participant.
    Click on the survey you wish to capture the responses for.
  4. Once the survey has been selected, the survey will run just as if the participant is completing the survey, except that a record is kept of each section the administrator completes, noting which administrator captured the data.
Managing survey output
  1. Select Data from the main navigation menu.
  2. You will then be directed to the Data Manager page. This page lists all surveys captured for your group. If a survey has yet to have any data captured for it, then a message will appear alongside the survey stating so.
    Locate the survey you’re interested and select the View button for the survey.
  3. You will then be presented with a tablature view of the data captured so far. You can navigate the table data as follows:
    • Each row represents a single participant.
    • Only participants who have attempted the survey will be listed here. In other words, only those participants who have completed any of the survey sections will be listed.
    • Each participant is listed with a Survey status, showing whether the survey is complete or incomplete.
    • Each column is labeled by its respective Section number and Item number. Hover your mouse of the column Item Number to see the question asked for this item.
    • You can use the arrow buttons or the scroll bar to navigate through the data row.
    • At the end of each data row, you will find the user who captured the data, whether they be the participant themselves, or an administrator. If you hover your mouse over this cell, you can this broken-down for each section.
    • Click on the Survey’s item list button to view a complete list of all items for the survey to use as a reference.
  1. Select Data from the main navigation menu.
  2. You will then be directed to the Data Manager page. This page lists all surveys captured for your group. If a survey has yet to have any data captured for it, then a message will appear alongside the survey stating so.
    Locate the survey you’re interested and select the Export dropdown for the survey.
  3. The Export dropdown lists 3 file format types that you can export to:
    1. Export to CSV file
    2. Export to XML file
    3. Export to TXT file
  4. Select the file type you would like to export the survey data to and the download will begin automatically. Depending on your browser settings, you may be asked where to save the export file, or your browser may download the export file directly into your Downloads folder.